
Article by Markus Zinkl
Introduction
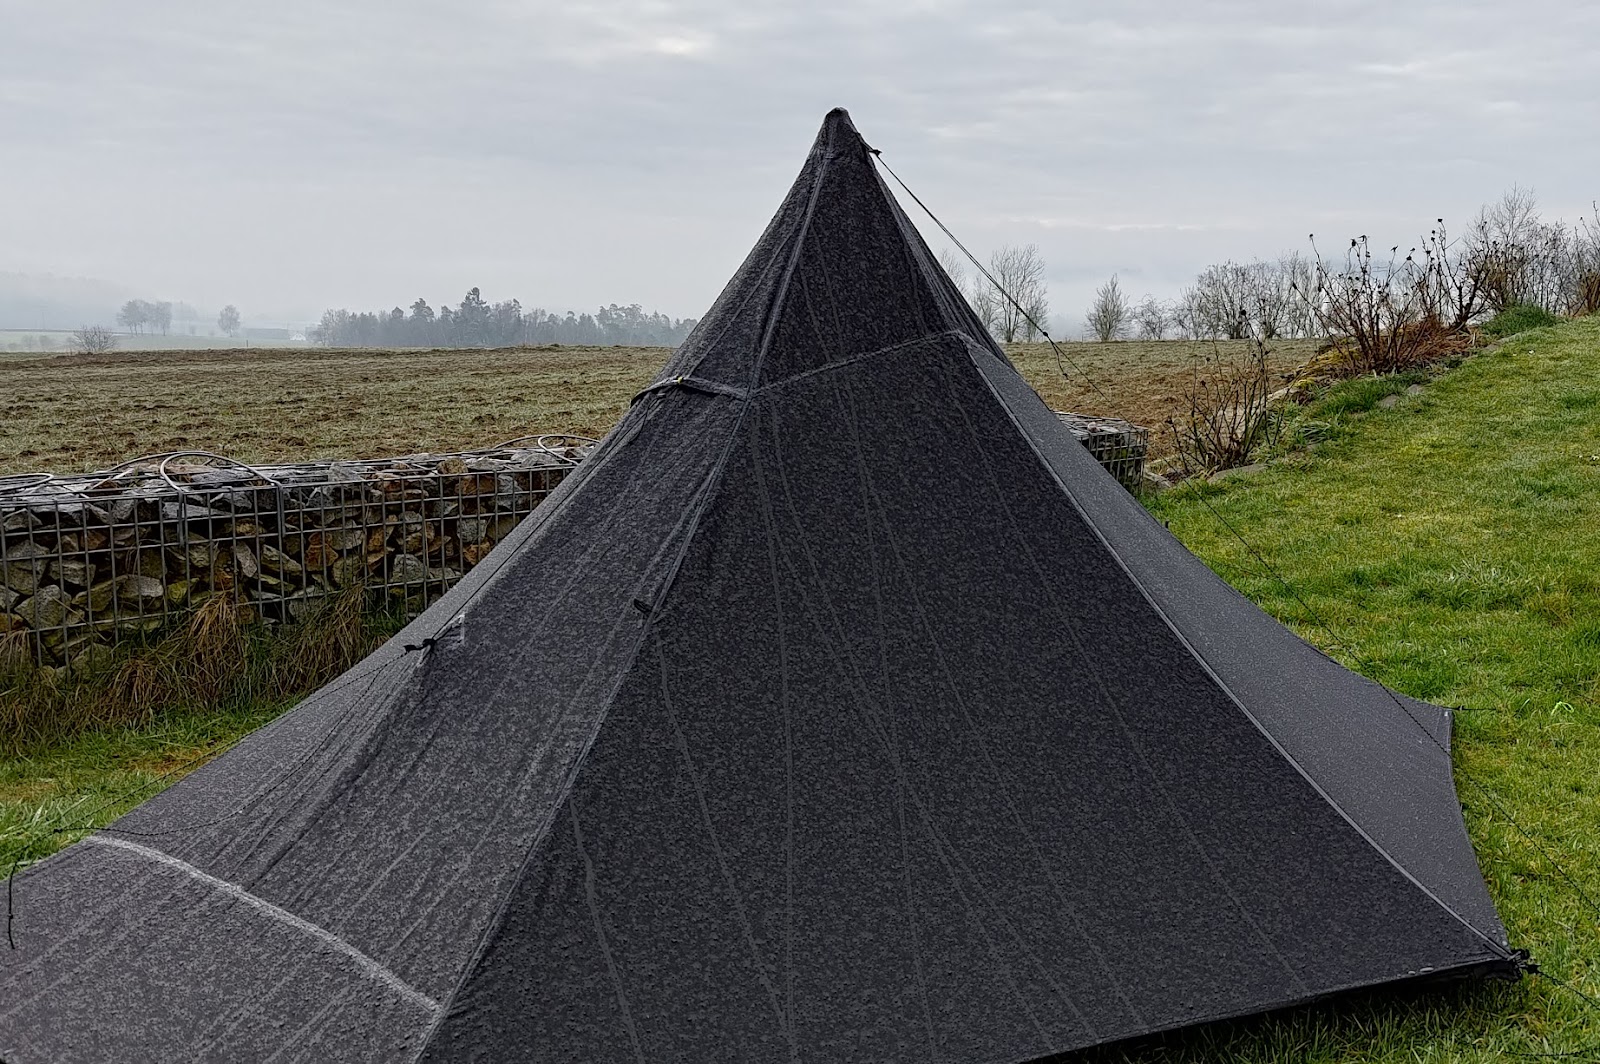
Liteway Equipment is a cottage company based in Ukraine. They make ultralight gear for hiking and camping such as shelters, backpacks and sleeping bags etc. Liteway sent me their new one-person Illusion tent. It is a classic single-wall trekking pole tent, which uses one of your trekking poles instead of dedicated tent poles. This is my preferred style of tent, because I’m carrying my poles anyway and can save some weight along the way during my fast packing trips. The tent has some nice new details I’ve not seen before in other tents. It also uses SilPoly as the main tent fabric, which is finding more and more applications in ultralight tents recently, this in comparison to the classic SilNylon fabric. Let’s see how it performs.
Pros:
lightweight
good value for an ultralight tent
packs down small
spacious for a one-person tent
Cons:
Tent Overview
First of all, let's get the specs out of the way.
Materials:
1.1 oz Silpoly 20D Ripstop 2000mm (main fabric)
YKK AQUAGUARD zipper #3 (main door)
X-Pac (strengthening at the top of the pyramid)
Weight:
Official: 22.7 oz / 645 g with guy lines and stuff sack
Sample: 23.2 oz / 658 g with guy lines and stuff sack
Dimensions:
Outside: 9 ft x 47.2 inches / height 47 - 49 inches
276 cm x 120 cm / height 120 - 125 cmInside: 7.5 ft x 34.6 inches / max width in the middle 45 inches
230 cm x 88 cm / max width in the middle 115 inches
Colors:
Gray
Olive
Black
Price: $373
The tent ships with guylines only and is not seam sealed. Tent pegs and seam sealer need to be purchased separately. This is quite common with ultralight tents. This way, you can choose your preferred peg style. For the seam sealing, though, I would wish to have the option to get it factory seam sealed. I sealed a handful of tents over the years and it is no rocket science, but has to be considered when purchasing. I’ll explain how to seal a bit more in detail in the weather resistance section.
Setup and Take Down
The tent comes with 5 short guylines for the corners/front door and 4 long guylines for the back, peak and sides of the tent. The guylines need to be attached to the linelocs first before setting up the tent.

You first start with staking out the 4 corners of the tent. Then insert your trekking pole set at 130 - 135 cm into the little insert at the bottom center of the tent. This is quite unique and I have not seen this style before. The bottom of the pole is basically outside with the top of the pole inside the tent.
I would recommend setting the pole at 135 cm to raise the sidewalls at the foot and head end of the tent. In windy conditions, you can lower your pole a bit and get the tent lower to the ground to avoid draft under the tent walls. This unique setup is basically a combination of classic tepee style shelters with the pole inside the middle of the tent and a classic trekking pole shelter like the Six Moon Designs Lunar Solo with the pole outside the tent. You get the best of both worlds, it keeps the pole out of the way inside the tent and also creates a steeper back wall angle, which increases headroom.
Next you stake out the front and back guyline.

In both cases, the guyline at the bottom and top connect to the same stake, as in the picture above from the back. The last step is to tighten the guylines to get a nice pitch. The setup is pretty straightforward and easy to do. I recommend this good setup video on at Liteway (setup video).
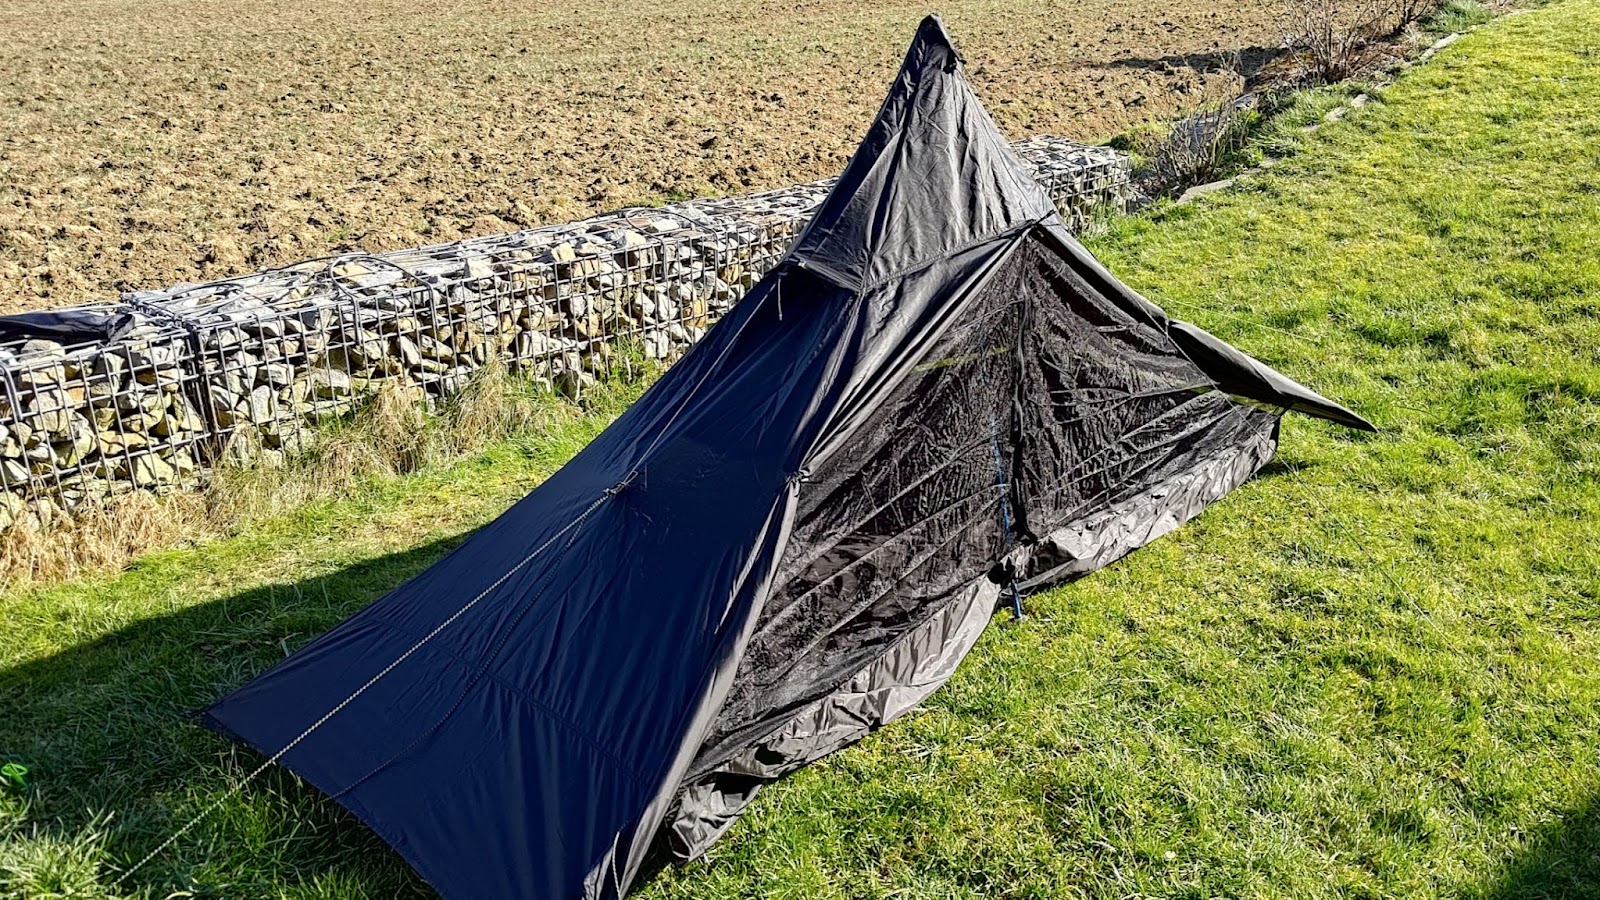
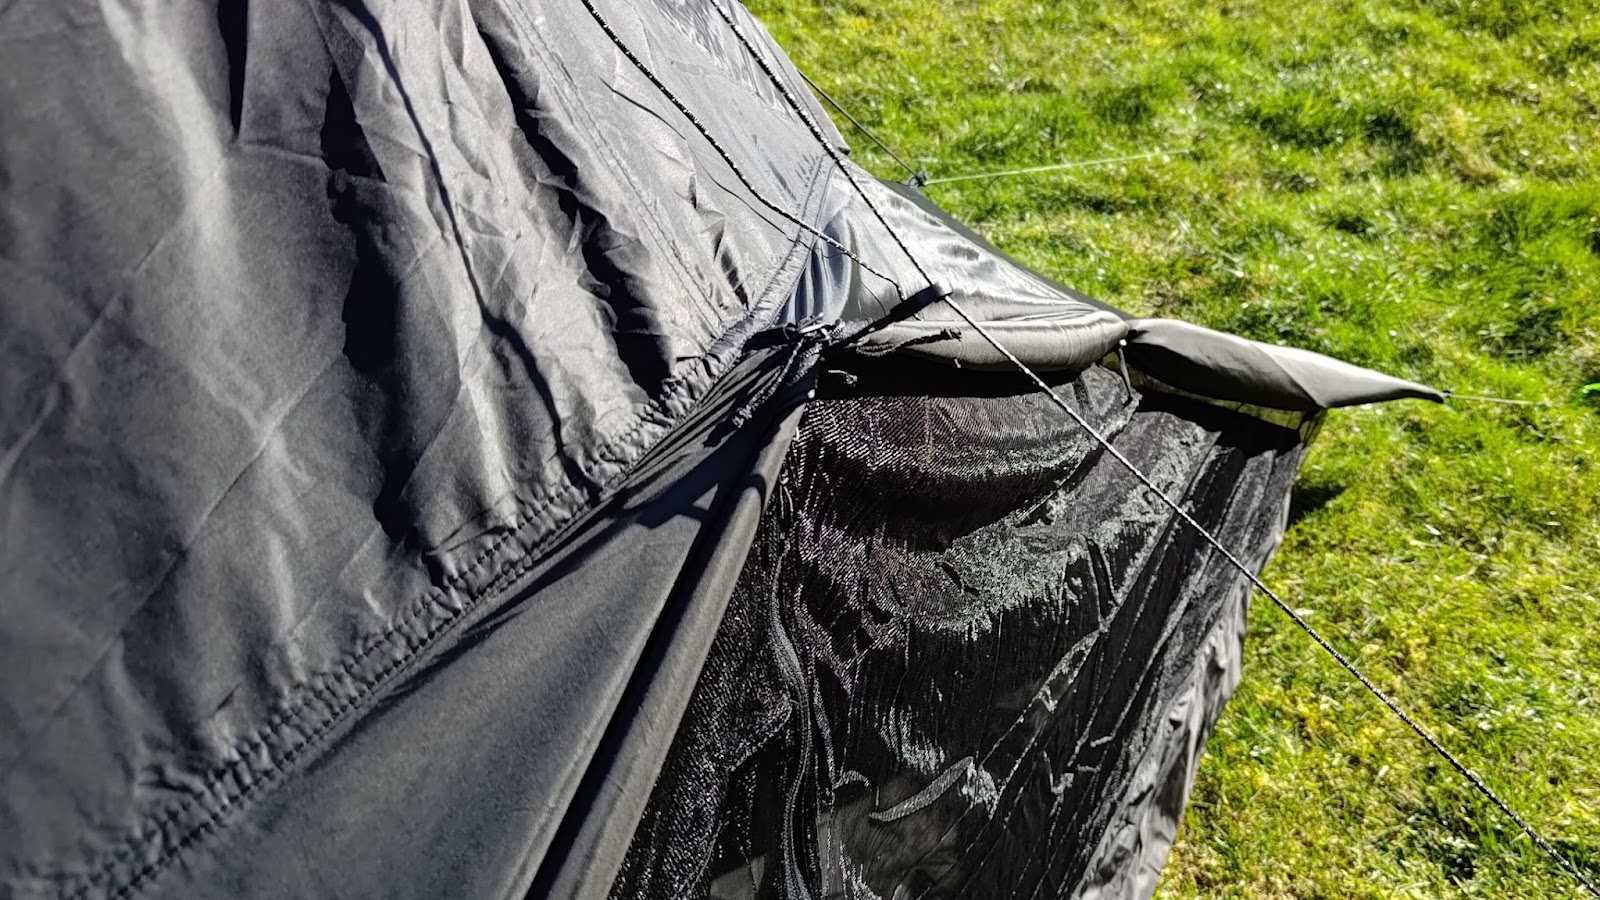
The side guy lines are optional. I would recommend them, though, because it greatly increases head and foot room. The setup here is again unique. The guy lines connect at around the middle of the side wall and then connect with a bungee cord to the peak at the top. This does a great job to pull out the sidewalls. At the top, you have two ventilation openings, which help with condensation inside the tent. Then you have a few vestibule variations. Fully closed, one door opened and both doors opened.
With both doors opened, you can attach a little hook to the front guyline, which pulls out the front wall and increases headspace again.

The front door design could be improved in my opinion. I don’t really understand the reason for the buckles in the front. Besides that, the line locks are not attached to the very bottom of the seam, which causes the seam to fold over. So it is not possible to open the door with only one hand and especially with the YKK water-resistant zipper, which has quite a bit more friction than a standard one.
Weather Resistance
The weather resistance depends on how a good of a job you do with seam sealing the tent. The fabric itself is more than capable for any rain showers you will encounter, but the seams need to be sealed completely to cover all little needle holes and even all threads. Otherwise, the treads will saturate with water and slowly soak through.

Liteway recommends McNett SilNet, which can be purchased on their site l. I recommend diluting it a bit with mineral spirit or a universal thinner to honey like consistency. This makes it much easier to apply it. Undiluted, it has a thick consistency and you are more likely to make a mess during application.

It is best applied when the tent is pitched and the guylines taut and tight. After application, let it dry for 24 hours. I set it up in my backyard for 3 days during on and off rain to test if all seams are sealed.
In the introduction, I have already mentioned the main fabric of the tent. Liteway uses SilPoly as the main fabric of the tent. This is a polyester base fabric with Silicon coating to ensure water proofing. The fabric has a few advantages over the more usual SilNylon fabric with a Nylon base fabric and Silicon coating. In comparison, SilPoly does not absorb water and therefore does not stretch as much as SilNylon. So the tent also dries quicker and you don’t need to carry the additional water weight. It is also more UV resistant, which should add to its durability.
On the other side, SilNylon is more tear resistant than SilPoly at the same weight. This is why the fabric manufacturer of the SilPoly is important. In the case of a good quality SilPoly as here, the advantages overweigh the tear resistance and I would always prefer SilPoly.
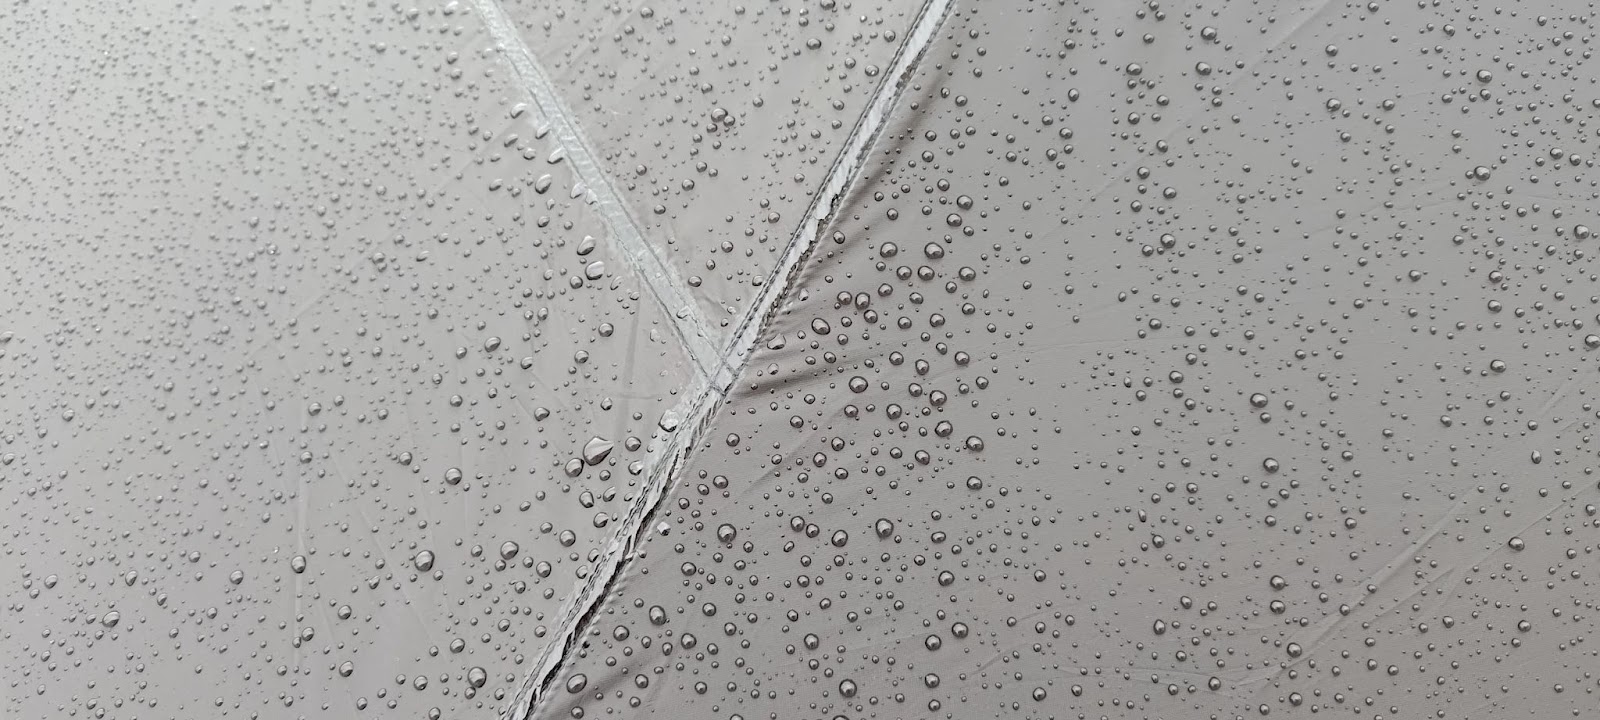
In the case of the Illusion tent, SilPoly really shone in my 3-day rain test. It did not sag a bit and the guylines did not require any re-tightening.
I was not able to test it in high winds yet, so I can’t give a definitive conclusion on storm worthiness. From my impressions, it is pretty stable though, if pitched low to the ground with staked out side-walls. I’ll update the review after wind testing.
Comfort and Space
Due to the unique inside out pole design, the Illusion tent provides a surprising amount of space inside the tent and especially so for a solo shelter.

In the picture above, you can see my regular wide sleeping pad with dimensions of 72 x 25 inches / 63 x 183 cm. It provides plenty of room to store the rest of your gear inside the tent as well.

The tent also features two pockets for storage. I really like the placement on the top of the tent to keep my stuff off the floor. Pitched with trekking poles to 135 cm and the sidewall guylines, it has plenty of head and foot room.

Being 6 ft tall, my feet or head do not touch the side wall, which is important for single wall tents. In inclement conditions, you can’t really avoid condensation inside the tent. If your sleeping bag or quilt touches the walls, it will soak through overnight and especially with down wet sleeping bags/quilts lose its loft and insulation. The Illusion performed excellently here.
Ventilation and Condensation
As mentioned above, condensation can be an issue with single wall tents. The Illusion has two vents at the peak of the tent.

The vents can be opened with a little stick attached to a little piece of Velcro. Both vents do a great job with minimizing condensation. If wind conditions allow , I would always pitch the tent as high as possible. This also helps with air flow and minimizes condensation. I got a little bit of moisture build up, which is normal and can be easily wiped off with a cloth.
Value and Price
The value of the Illusion solo tent is exceptional. The tent is handmade in Ukraine and the craftsmanship is top-notch. The tent did not have a single loose thread and stitching is flawless. As I mentioned before, SilPoly needs to be of good quality in order to outperform SilNylon, which is more readily available in good quality than SilPoly. Considering all that, for the price, value is outstanding.
Conclusion
I really enjoyed using the Illusion Solo. Its ease of setup, high quality materials and great craftsmanship make it an excellent choice for ultralight backpacking, fast-packing and bike-packing.

It’s small pack size and lightweight makes it also great for fast-packing. It easily fits into a usual 28l fast-packing pack. I also used it in light winter conditions, so I can definitely recommend it for full 3 season use. See the link below, if you are interested in the tent. Liteway also contributes from their sales to humanitarian and medical aid to the destroyed cities of Ukraine.
SHOP FOR ALL LITEWAY PRODUCTS INCLUDING ILLUSION TENTS
Samples were provided at no charge for review purposes. RoadTrail Run has affiliate partnerships and may earn commission on products purchased via shopping links in this article. These partnerships do not influence our editorial content. The opinions herein are entirely the authors'.
EUROPE Men's & Women's SHOP HERE
Europe only: use RTR code RTR5ALL for 5% off all products, even sale products
- 10% Savings Every Day* 5% Back in Rewards Cash
- Test Run Shoes 90 Days Worry Free
- Crazy Fast, FREE Shipping
- NONSTOP PERKS

AMAZON
You can read the running biographies of all the RTR testers here.
The products that are the basis of this test were provided to us free of charge by Liteway Equipment. The opinions presented are our own.
We welcome comments and questions in the comments section.
To best address your questions, please include your running workload, speeds, race distances, and current shoes if possible.
HERE YOU CAN BUY THE LITEWAY PRODUCTS
4 comments:
Thank you for the informative review. I am interested in the Illusion tents, but reviews are sparse as they are new. Regarding the clearance between the footbox and the fly, could you inform the type of sleeping bag you used, summer or winter? How much clearance was there?
Btw, I believe that the function of the door buckles is to reduce tension on the zipper.
Hi Niko, I used the Thermarest Vesper 20 degree bag. I had a good clearance of around two inches there laying on the back. Regarding the buckles, I used the GG the one dcf also with ykk water-resistant Zipper without tension relief buckles and neverr had a problem with it. Even with Dcf stretching less then Silpoly. But a good point, maybe it's geometry needed the buckles.
In the United States, private companies may facilitate the fast-tracked application procedure for an Fast passport. The agency must be officially recognized by the United States Passport Administration. The cost will vary based on how fast you need the documentation. Costs might mount up, particularly if the paper has to be sent quickly.
Post a Comment